
Let's face it - the billing process is not the most exhilarating task. However, if you want to get paid for your hard work, it is a necessary one. A clear understanding of invoices in combination with a solid invoice process will allow you to track, manage, and settle payments effectively.
Read on to find out what an invoice is, why professional invoices are so important, and how to make a professional invoice.

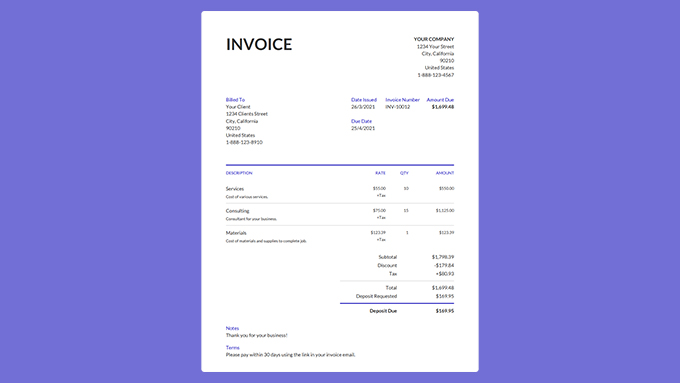
First off, what is an invoice? Simply put, an invoice is a document sent by a seller to a buyer requesting payment. An invoice serves as an official and legal record that outlines the items or services provided, the total amount owed, and when to pay.
Creating invoices can be simple if you have the right tools.
Whether you are a freelancer, contractor, or small business owner, professional invoices are crucial for every business. By clearly and accurately laying out all of the information your client needs to pay you, you can expect fast and reliable payments.
But, what is the best way to make an invoice?
Creating invoices can be simple if you have the right tools. Luckily, there are several ways to make an invoice, so you shouldn't have trouble finding a method that works for you.
From creating invoices from scratch to using an invoice generator, check out each of these methods, weigh the pros and cons, then decide which is the right fit for you and your business.
Manually creating invoices is appealing because it is free, and the customization options are endless. However, this method is more complicated, more time-consuming, and prone to invoicing mistakes. But, if you choose to go this route, you will likely use spreadsheet software like Microsoft Excel or Google Sheets or a word document like Microsoft Word or Google Docs to create your invoices.
First, create a new document using the program of your choice and ensure you have the following information:
Then, manually create the relevant sections and accurately enter the information. Choose the design you want, such as the font (size and style), color scheme, and logo.
Now, spend some time on the layout and format. By double-checking to make sure the calculations are correct and the print format works, you should have an accurate and clean invoice.
One last tip, once you have created your invoice, make sure you save it so you can use it again as a basic template for future invoices.
Now it is time to send your invoice! You can send the invoice to your client by email, text message, or by mail. We recommend sending invoices by email or text message because it's faster. After all, the sooner your client receives their invoice, the sooner you get paid.
Pros: At no cost, you can completely customize the look and layout of your invoices.
Cons: Manually creating invoices is more challenging, increases the likelihood of errors and miscalculations, time-consuming (ex. manually tracks invoices, performs calculations, etc.), and makes it more difficult to track payments.
Using a pre-made invoice template is much easier than creating your invoice manually. Whether you choose to use a Microsoft Word template or a Google Sheets template, the invoice template will include all the required sections and formulas. So, all you have to do is enter the information and double-check the calculations.
Invoicer offers a variety of invoice templates. To get started, complete the following steps:
Once you've filled in the sections, ensured the calculations are correct, and are happy with the overall format, it's time to save and send! Again, try to avoid snail mail if possible.
Pros: Pre-made invoice templates are free, you get to choose the look and layout, and all you have to do is fill in the information.
Cons: Similarly to manually creating invoices, invoice templates are still prone to miscalculations and errors, still time-consuming (double-checking calculations, etc.), and it's still difficult to track payments.
Invoice generators are the easiest and most productive way to make invoices. These seamless invoicing tools will guide you step-by-step through the invoice creation process, perform calculations automatically, information entered saves automatically, manage clients, receive online payments, and even more.
To create an invoice using an affordable invoice generator like Invoicer, check out this tutorial video and follow the following steps:
Now you can preview your invoice by clicking the View tab. This stub view is what your client will see when they see the invoice from their email. Alternatively, select the PDF button to download and see the invoice as a PDF. Once you're satisfied, hit Send to get the invoice to your client instantly or send the PDF version via email or text message.
Note: To download a PDF version and send your invoice, you will need to create a free account (If you haven't done so already!). When you sign-up, you can create, manage, and send invoices from any device, from anywhere, at any time.
Pros: Making invoices with an invoice generator is easy, fast, and accurate. You can create and send invoices from anywhere. Plus, the information you enter saves right away, and calculations are automatic. To top it off, you can keep client profiles and invoices organized, track payments, send payment reminders if needed, and so more.
Cons: There are fewer customization options with invoice generators, and they are usually a paid service.
When weighing the pros and cons of making invoices manually, using invoice templates, or using an invoice generator, it's obvious which method is the best.
Manually creating invoices and using invoice templates are similar in that they can be challenging, time-consuming, and are more prone to errors and miscalculations.
However, the features offered by an affordable invoice generator like Invoicer are guaranteed to save you both time and money.
Don't take our word for it! Create an invoice with Invoicer.ai now and see how easy invoicing can be!


.png)